I am now selling card kits for the cards below. The kit includes everything you need to make the card, except glue. They are $4.00 each, plus shipping. Some are easier than others to put together, but none of them are difficult! Let me know which ones you want by emailing me at terry.duncan088@gmail.com. (The first card is not available. It’s not mine!)
It’s been a while since I’ve posted. I can’t believe it’s January 10th already! Hopefully, this year will be much better for everyone.
Here are the 3 cards for my first class of the year at Krafts by Kathleen’s on January 14th at 1:30 pm. Just call the store at 727-807-5055 to reserve your spot as space is limited. The class is $25 and includes everything you need to make the cards.
Two of the cards are fun folds. This class is also available by mail. Just email me at terry.duncan088@gmail.com to let me know if you’d like the kits and instructions.
Krafts by Kathleen 6518Massachusetts Ave. New Port Richey, FL 34653
Ready to make some fun cards with the Round We Go Bundle? Here are some ways to make an easy card… and then to step it up!
A simple card is always refreshing—just add some color to the pinwheel stamps, cut out one of the Round We Go Dies and add your sentiment with some Baker’s Twine, like we did with the Fijne verjaardag card.
Want to step it up? Stamp the pinwheels onto Basic White Cardstock, then layer die-cut pinwheels in matching cardstock on top of the stamped image, but offset the arms to make a full pinwheel.
Still want to do more? Grab the rosette die, then cut it half lengthwise before folding and assembling it. Add in some die-cut circles, a splatter of Wink of Stella, and then BOOM—you’ve got a fun 3D card!
We loved how these turned out and we would love to see what you come up with! Show us how you stepped it up on social media.
I have the new Stampin’ Up! Holiday Mini Catalog and the new Scrapbooking brochure for you to peruse now. Just click on the photo of them in the right column of this page. Don’t forget to use the monthly Hostess Code CZGJ67MM when you place your online order between $40.00 and $150.00, before tax and shipping to get your FREE gift from me! If you’re order is over $150.00, before taxes and shipping, don’t use the Hostess Code because you will receive Hostess Dollars to spend, as well as the FREE gift from me when you place your order! (Just let me know your order was over $150.00 before taxes and shipping.) You add the Hostess Code to your order right before checking out. Please let me know if you have any questions or problems. This month’s FREE gift is your choice of a package of gems from the new 2024 – 2026 Stampin’ Up! Annual Catalog or the Holiday Catalog.
This month’s Hostess Code is CZGJ67MM Thanks for stopping by and have a crafty day!
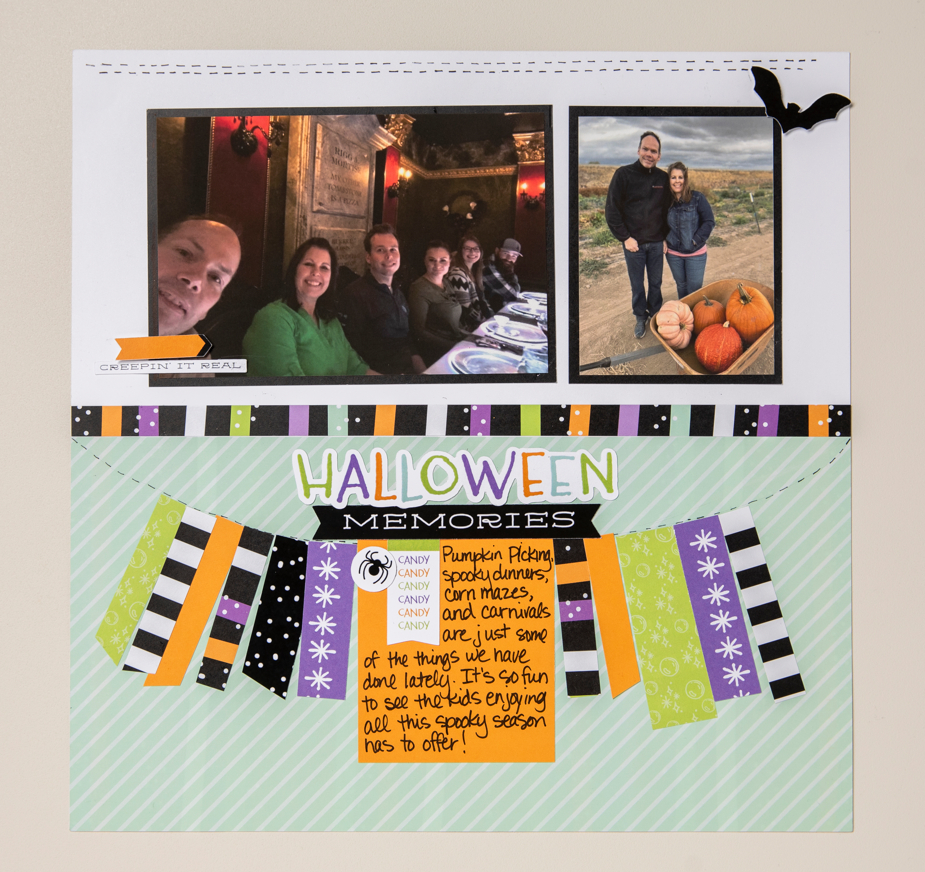
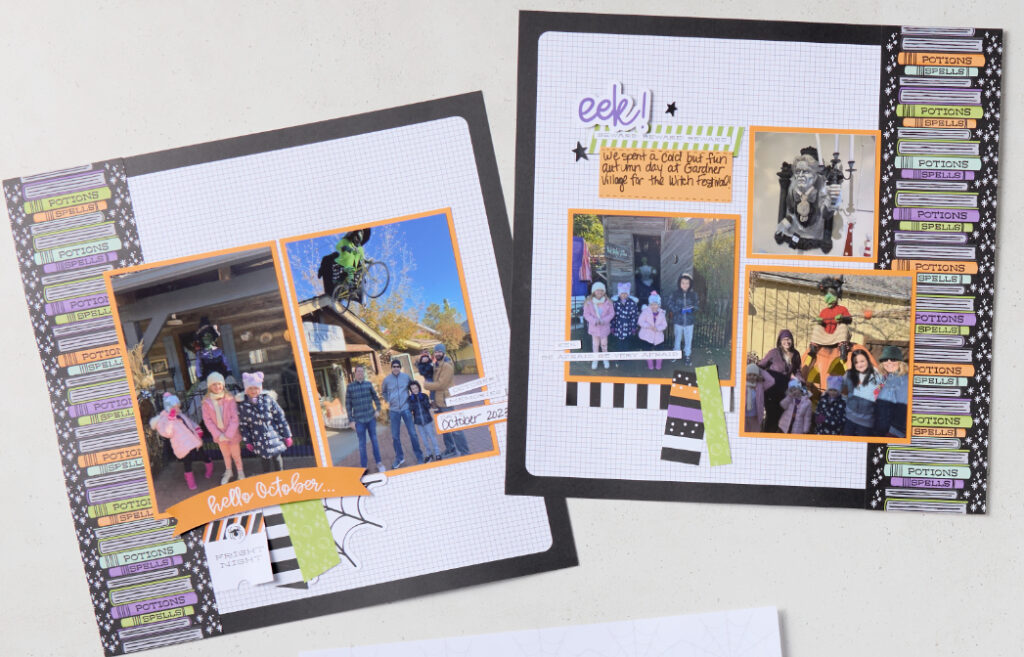
Capturing your favorite Halloween memories is always easier with the right tips and tools for the job! And with spookily sweet new products and plenty of creative Halloween scrapbooking ideas from Stampin’ Up!, this year’s moments are going to be frightfully fun to bring to life.
Halloween Scrapbooking Essentials
The best tools for creating fun and memorable Halloween scrapbook layouts range from basic to advanced, but a combination of a bit of everything on the spectrum never hurt anyone!
Halloween Scrapbooking Kits
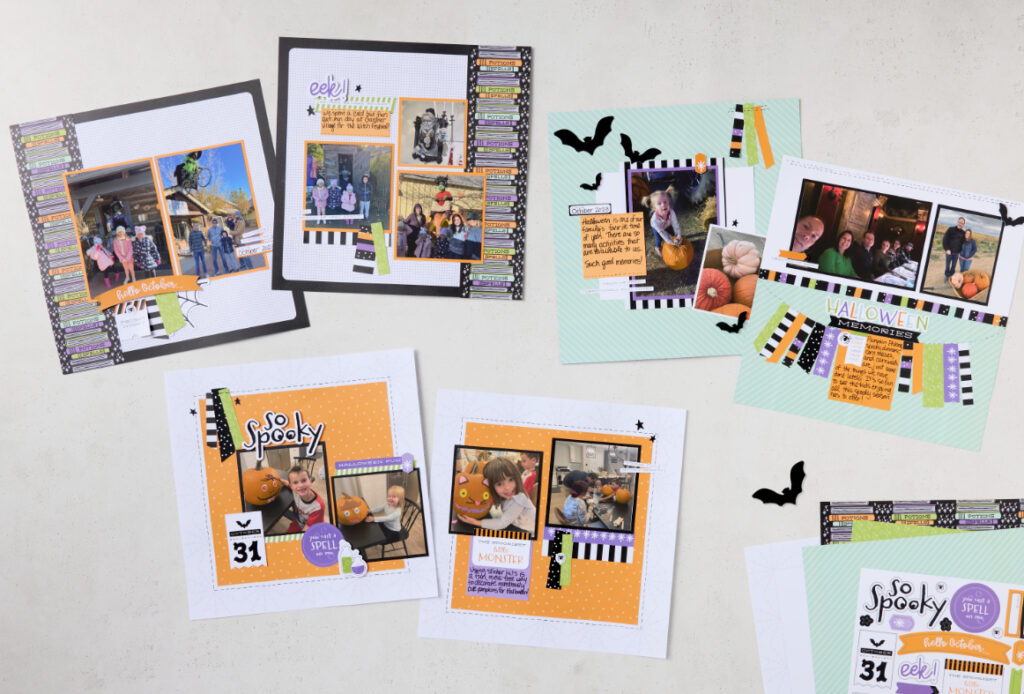
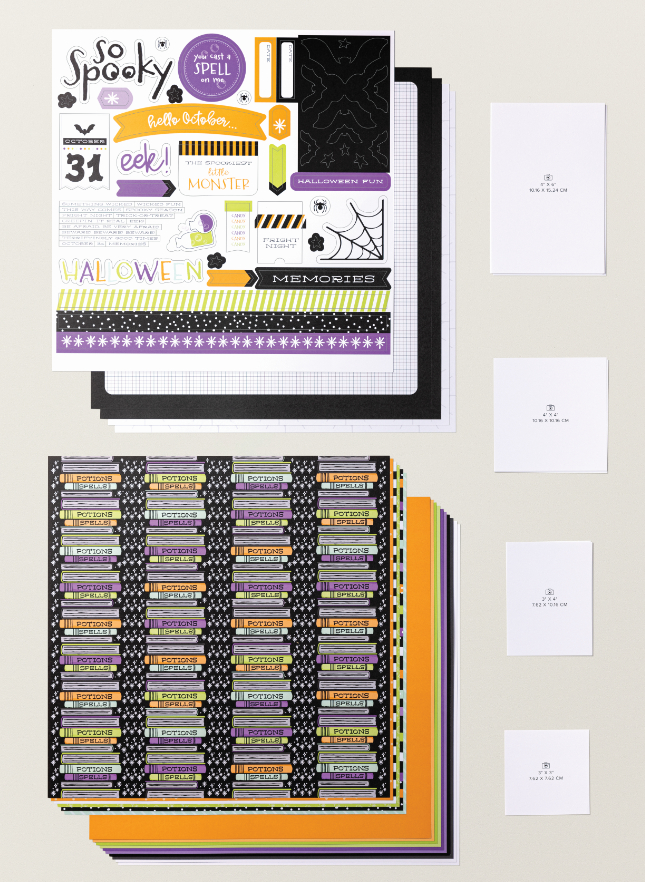
This year, we’ve made your Halloween scrapbooking easy with our Halloween Memories Scrapbooking Workshop Kit. It has the supplies in a classic Halloween color palette to create three predesigned two-page scrapbook layouts. You’ll get step-by-step instructions, patterned paper, two-tone cardstock, printed stickers, and die-cut images. You’ll have six adorable Halloween scrapbook pages in no time at all. More time for sneaking candy from the stash.
Halloween Patterned Paper for Scrapbooking
The best scrapbook layouts start with the perfect paper—whether in plain colors or playful patterns—you want quality paper as the base of your Halloween scrapbook pages. This year’s Halloween Spells Designer Series Paper from Stampin’ Up! ticks the quality box and brings bright and even unexpected shades and designs into the Halloween theme. You can get this paper alone or as part of the Halloween Memories Scrapbooking Workshop Kit. Plus, with every print so well-coordinated, you’ll have no toil or trouble combining papers for the perfect blend of eerie and sweet.
Halloween Stamps for Scrapbooking
Stamps are another essential in any Halloween craft toolkit. They add a layer of customization and dimension that’s hard to find outside handmade Halloween scrapbooking designs. Their versatility makes them an incredible investment for all kinds of projects and crafts, particularly when you add the power of die-cutting into the equation! This way, you get precise cuts and customized ephemera to add to your designs.
Playful Ghosts Stamp Set
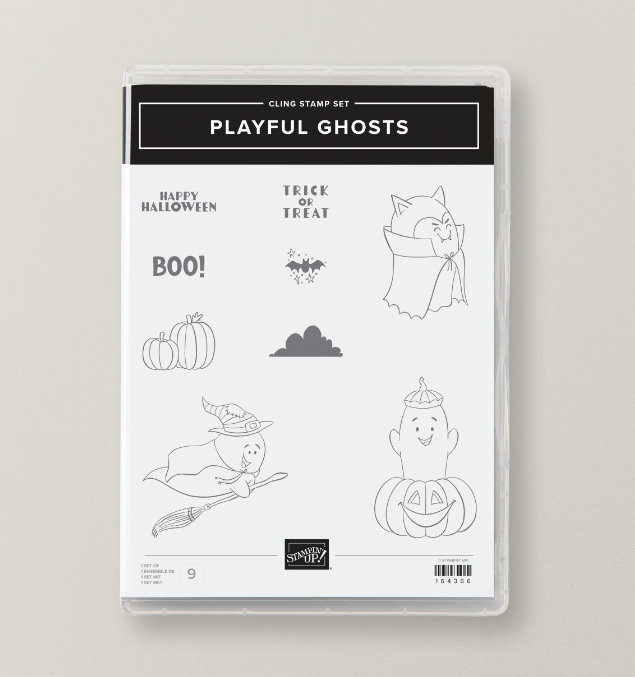
Need some stamps to take your easy Halloween scrapbooking ideas to the next level? The Playful Ghosts stamp set from Stampin’ Up! is a whimsical collection of ghosts in costume, perfect for complementing photos of your own little ghoulies during a night of Halloween fun. Accompanied by friendly phrases, bats, and pumpkins, this set is also perfect for other Halloween crafts, such as handmade cards and gift tags!
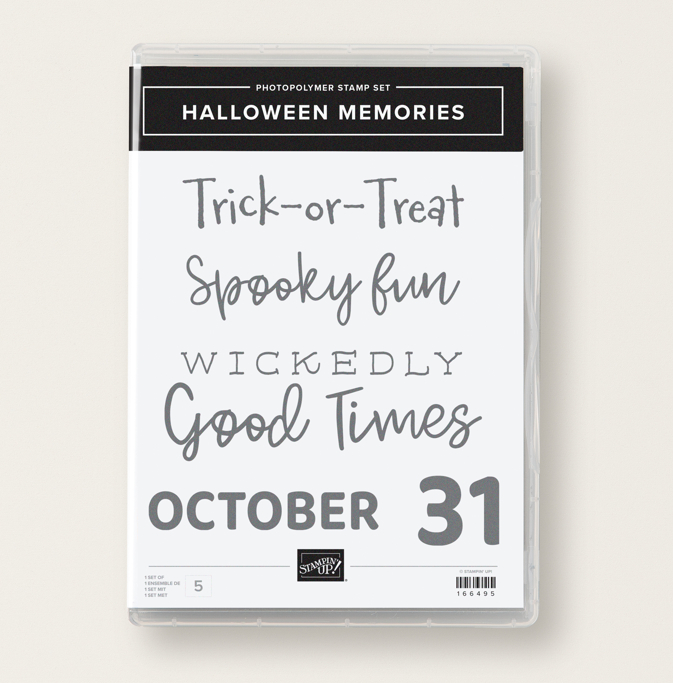
Halloween Memories Stamp Set
Want more Halloween-themed stamps to enhance your scrapbook layouts? Timeless sentiments like “spooky fun,” “wickedly good times,” and “trick-or-treat” in our Halloween Memories stamp set are perfect for haunting your pages.
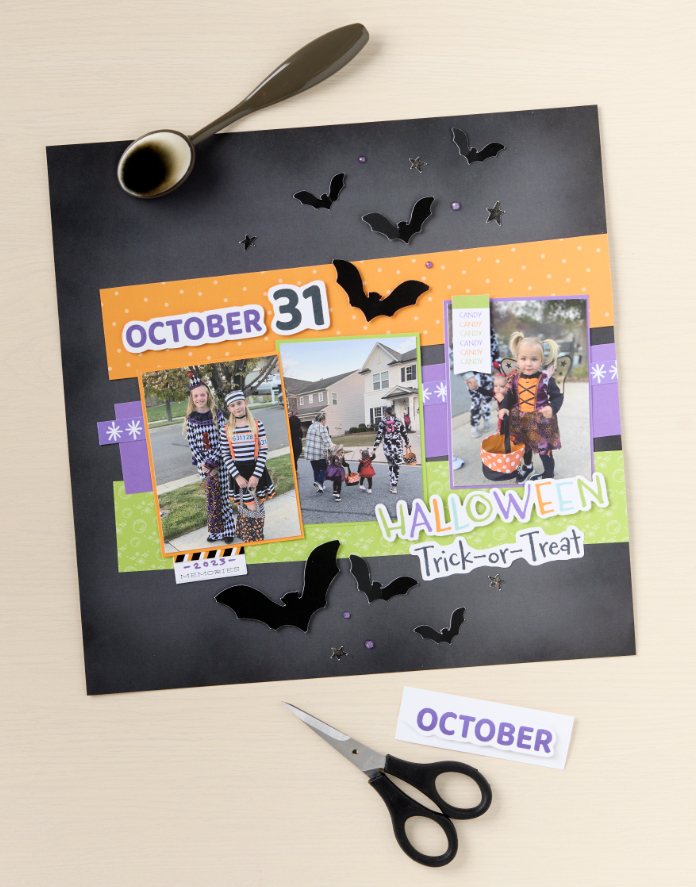
The “October” and “31” stamps are sure to be paper crafting and memory keeping favorites for many autumns to come. The phrase stamps are sized perfectly for titles and the different fonts add a playful touch.
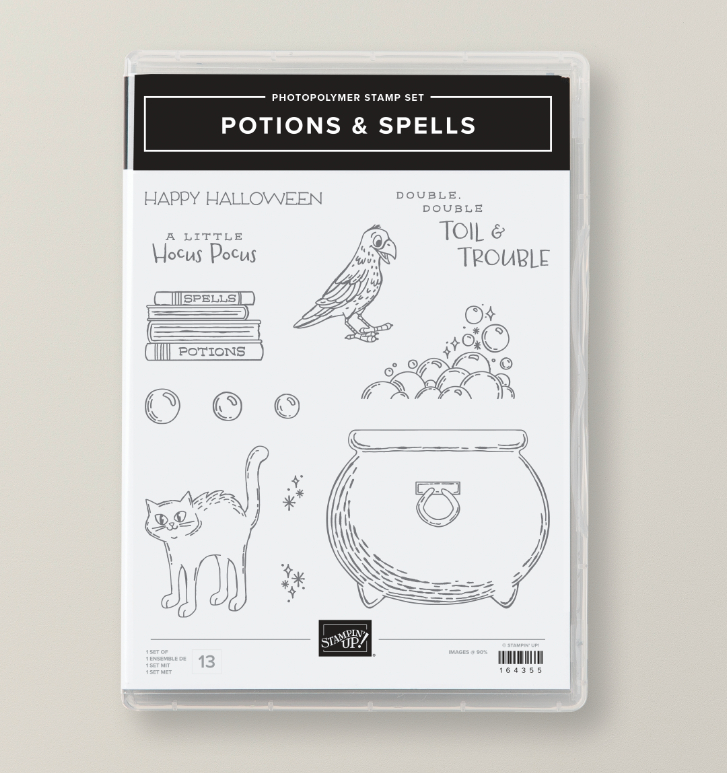
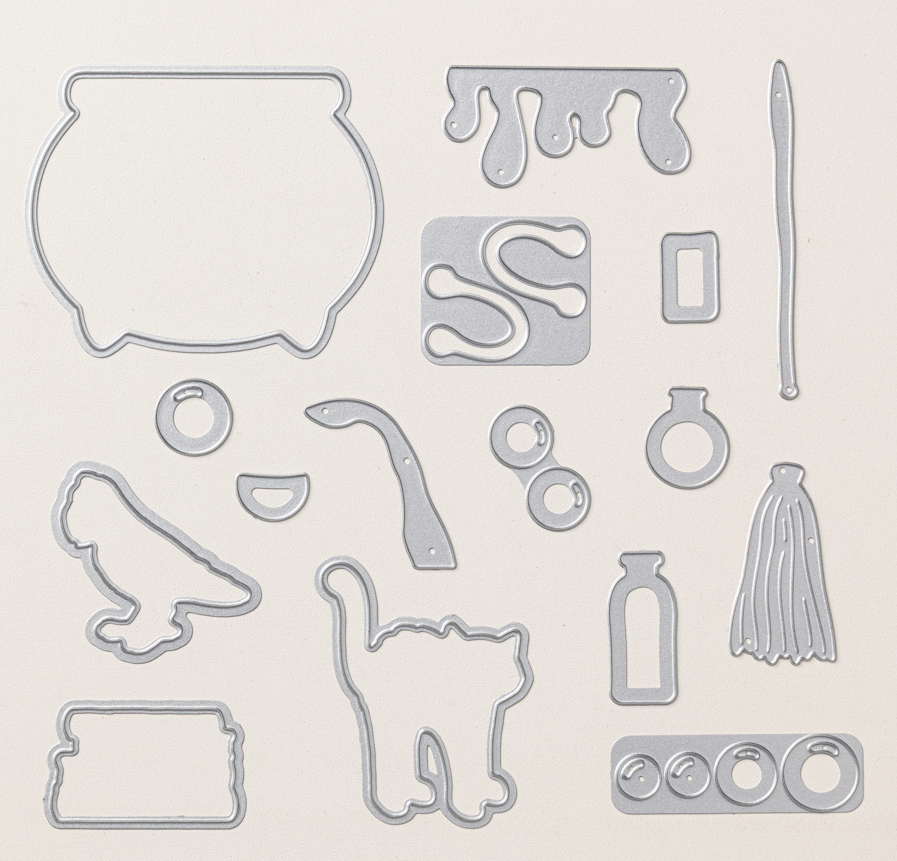
Potions & Spells Dies
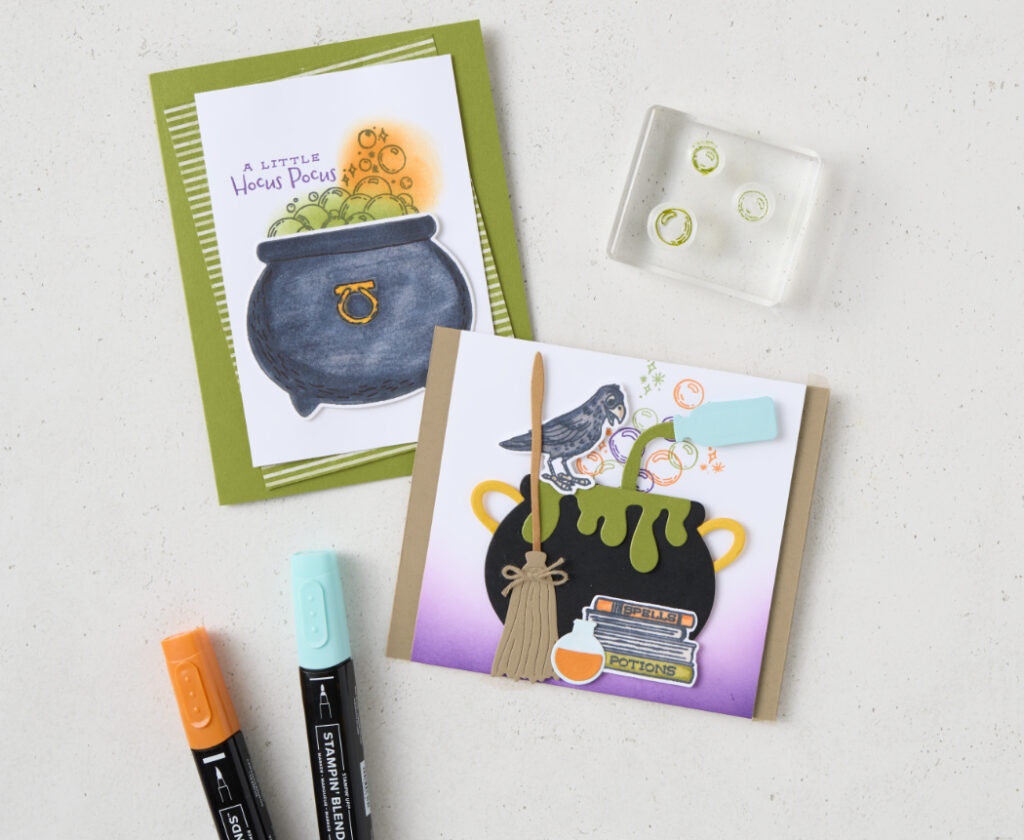
For those who enjoy a little bit of hocus pocus, the Potions & Spells stamp and die bundle is for you! Bubbling over with frightfully cute characters, spellbooks, and seasonal sentiments, this Halloween stamp set contains a recipe for tons of versatile creativity.
And with coordinated dies, you get those neat edges and perfect borders every time!
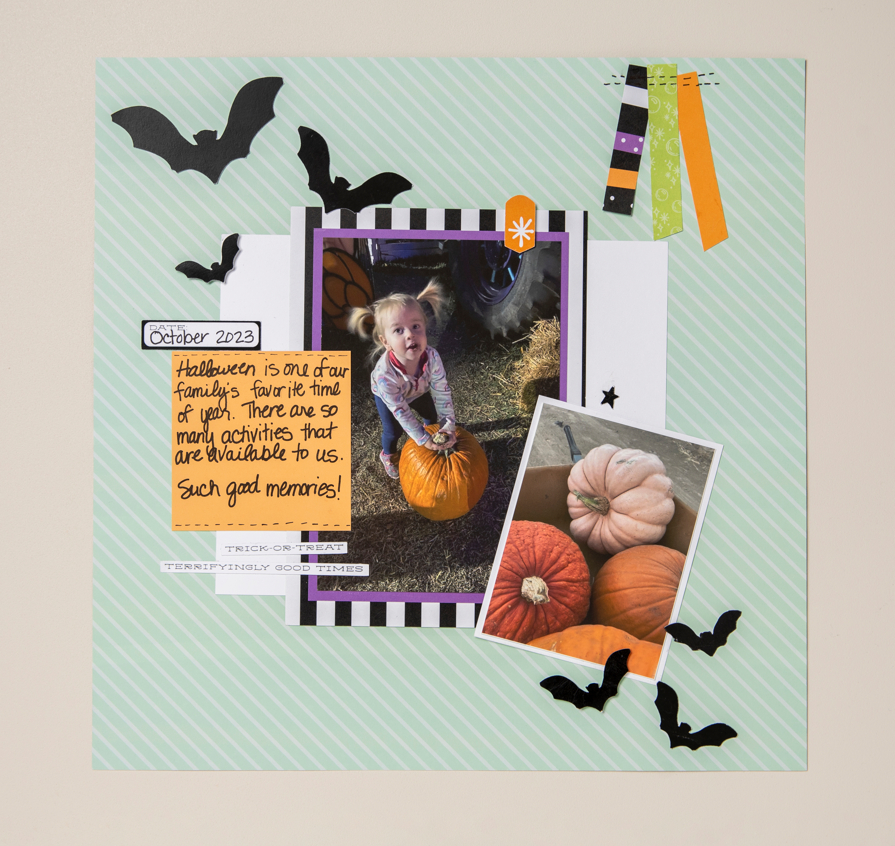
Halloween Scrapbooking Ideas to Love
Ready to implement some of these tools and techniques into your own Halloween scrapbooking ideas? Why not start with an unexpected color from the Halloween Spells pack that includes the Halloween Spells Designer Series Paper and an adorable sticker sheet?
Featuring a diagonal stripe and our classic Pool Party teal, this paper brings out the lighter side of Halloween while still coordinating with other more traditional Halloween-themed designs in the collection.
Perhaps you find yourself with a couple of the cutest witches Halloween has ever seen—try incorporating the stamps and dies from the Potions & Spells bundle to really represent those wickedly good times.
The stickers in the Halloween Spells Designer Series Paper & Sticker Sheet makes it easy to create scrapbook page designs using your own eye for layout and more. But if one sentiment just doesn’t seem to fit, replace it with a phrase from another Stampin’ Up! Halloween stamp set. Likewise, the stickers can be spread to other Halloween paper crafts like handmade cards and goodie bags! Don’t be afraid to mix and match.
See a card design you like? Try incorporating that into your own scrapbook page layout. Replicating these well-thought-out arrangements as part of your larger Halloween scrapbooking idea creatively elevates your overall layout and makes full use of your stamps, dies, and fun patterned papers!
Emboss the Basic White (layer), Daffodil Delight and Pumpkin Pie aligning them vertically in the embossing folder.
Adhere the Pumpkin Pie cardstock to the bottom of the Basic White (layer) using liquid glue.
Adhere the Daffodil Delight cardstock above the Pumpkin Pie cardstock using liquid glue.
Adhere the Basic White (layer) to the front of the card base using liquid glue.
Die cut a stitched square using the Basic White (image) cardstock.
Stamp the image using Memento ink in the center of the Basic White square.
Color the image using the Stampin’ Blends Markers.
Use the Light Pool Party Stampin’ Blends Marker around the inside perimeter of the ghost.
Use the Color Lifter to lighten the color.
Use the Light Petal Pink Stampin’ Blends Marker to make cheeks on the ghost.
Use the Light Pretty in Pink Stampin’ Blends Marker to make a slightly darker area on the cheeks on the ghost.
Use the Color Lifter to lighten the cheeks.
Die cut a stitched square using the Basic Black cardstock.
Adhere the Basic White square to the center of the Basic Black square using Dimensionals.
Adhere the squares to the center of the card base using Dimensionals.
Stamp the greeting using Memento ink on Basic White scrap cardstock.
Die cut the greeting using the stitched banner die.
Adhere the greeting diagonally across the upper left corner of the Basic White (image) using liquid glue.
Add several coordinating Glossy Dots to the card front as shown.
I have the new Stampin’ Up! Holiday Mini Catalog and the new Scrapbooking brochure for you to peruse now. Just click on the photo of them in the right column of this page.
Don’t forget to use the monthly Hostess Code CZGJ67MM when you place your online order between $40.00 and $150.00, before tax and shipping to get your FREE gift from me! If you’re order is over $150.00, before taxes and shipping, don’t use the Hostess Code because you will receive Hostess Dollars to spend, as well as the FREE gift from me when you place your order! (Just let me know your order was over $150.00 before taxes and shipping.) You add the Hostess Code to your order right before checking out. Please let me know if you have any questions or problems. This month’s FREE gift is your choice of a package of gems from the new 2024 – 2026 Stampin’ Up! Annual Catalog or the Holiday Catalog. This month’s Hostess Code is CZGJ67MM Thanks for stopping by and have a crafty day! Terry Blog: http://www.classycutups.com On-line Store: https://teresaduncan.stampinup.net/ Email: terry.duncan088@gmail.com Phone: (727) 225-6006
We loved the color scheme of our Overjoyed for You card. In fact, we loved it so much that we decided to CASE it to make a new card! CASE stands for Copy And Share Everything. You can use this technique to copy different aspects of a card, like the layout or color, and create an entirely new card that’s all your own!
To create our new card, we used a color combination of Calypso Coral, Crumb Cake, Lemon Lime Twist, Pecan Pie, Petal Pink, and Soft Sea Foam. To start, we blended some Crumb Cake and Pecan Pie ink onto Pecan Pie cardstock using a Blending Brush. Then we colored our stamped flowers using Petal Pink and Calypso Coral Stampin’ Blends and our leaf images using Lemon Lime Twist and Soft Sea Foam Stampin’ Blends. We added some leaves that we die cut from Soft Sea Foam Cardstock, and then we added a sentiment made from Crumb Cake Cardstock.
And voilà—a brand-new card made using CASEd colors! If you like what you see, go ahead and try out CASEing for yourself!
I have the new Stampin’ Up! Holiday Mini Catalog and the new Scrapbooking brochure for you to peruse now. Just click on the photo of them in the right column of this page. Don’t forget to use the monthly Hostess Code CZGJ67MM when you place your online order between $40.00 and $150.00, before tax and shipping to get your FREE gift from me! If you’re order is over $150.00, before taxes and shipping, don’t use the Hostess Code because you will receive Hostess Dollars to spend, as well as the FREE gift from me when you place your order! (Just let me know your order was over $150.00 before taxes and shipping.) You add the Hostess Code to your order right before checking out. Please let me know if you have any questions or problems. This month’s FREE gift is your choice of a package of gems from the new 2024 – 2026 Stampin’ Up! Annual Catalog or the Holiday Catalog. This month’s Hostess Code is CZGJ67MM Thanks for stopping by and have a crafty day! Terry Blog: http://www.classycutups.com On-line Store: https://teresaduncan.stampinup.net/ Email: terry.duncan088@gmail.com Phone: (727) 225-6006
Intriguing, harmonizing color combos pack every square inch of our world! You’ll find them in the grocery store, at the auto shop, by the lake, in the fields—just about anywhere . . . or you can open our amazing catalogs and CASE color ideas the quick and easy way—which is something we do all the time!
To create our fabulous wedding card, we looked to an unexpected source: a children’s card! Yessica, our Concept Artist, said, “I chose a cute card with a very fun color scheme. I wanted to show how you could take colors from an almost juvenile aesthetic to a more mature and elegant look. Playing with colors is fascinating to me.”
We think the results are amazing! Yessica used the following products to create her beautiful card: the Golden Greenery and Greetings of the Season Bundles, the Distressed Tile 3D Embossing Folder, plus the Gold & Silver 1/8″ (3.2 mm) Trim Combo Pack. And let’s not forget to share her “wow!” color blend: Basic White, Calypso Coral, Daffodil Delight, Peach Pie, Pretty Peacock, and Smoky Slate.
I have the new Stampin’ Up! Holiday Mini Catalog and the new Scrapbooking brochure for you to peruse now. Just click on the photo of them in the right column of this page. Don’t forget to use the monthly Hostess Code CZGJ67MM when you place your online order between $40.00 and $150.00, before tax and shipping to get your FREE gift from me! If you’re order is over $150.00, before taxes and shipping, don’t use the Hostess Code because you will receive Hostess Dollars to spend, as well as the FREE gift from me when you place your order! (Just let me know your order was over $150.00 before taxes and shipping.) You add the Hostess Code to your order right before checking out. Please let me know if you have any questions or problems. This month’s FREE gift is your choice of a package of gems from the new 2024 – 2026 Stampin’ Up! Annual Catalog or the Holiday Catalog.
Reindeer Days 12″ X 12″ (30.5 X 30.5 cm) Designer Series Paper & Sticker Sheet [166612]
Real Red Stampin’ Blends Combo Pack [154899]
Stampin’ Cut & Emboss Machine [149653]
Forever Plaid 3 D Embossing Folder [164049]
Rhinestone Basic Jewels [144220]
Mini Stampin’ Dimensionals [144108]
Stampin’ Dimensionals [104430]
Multipurpose Liquid Glue [110755]
Stampin’ Seal+ [149699]
Bone Folder [102300]
Paper Snips [103579]
Silicone Craft Sheet [127853]
Paper Trimmer
Measurements
Garden Green (base): 5 ½” x 8 ½”, score at 4 ¼”
Garden Green (back): 2 7/8” x 2 7/8”
Garden Green (center): 2 ½” x 2 ½”
Garden Green (front): 2 3/8” x 2 3/8”
Garden Green (trunk): ¼” x 3/8”
Garden Green (tree): 2 ½” x 3”
Real Red: 3” x 5 ½”
Real Red (layer): scrap
Basic White (back): 2 ¾” x 2 ¾”
Designer Paper: 2 3/8” x 2 3/8”
Basic White (greeting): 3/8” x 3”
Directions See photos below
Emboss the Real Red (layer) using the embossing folder.
Adhere the cardstock to the center of the card front using liquid glue.
Die cut the tree using the Garden Green (tree) cardstock.
Adhere the tree to the Basic White (front) cardstock as shown (diamond orientation).
Adhere the Basic White (front) to the Garden Green (front).
Color 18 small rhinestone using the Dark Red Real Stampin’ Blends Marker.
Place the rhinestones in a trio cluster to represent berries among the holly leaves within the die cut tree.
Die cut the star using Real Red scrap cardstock.
Adhere the star to the top of the tree using a Mini Dimensional.
Adhere the designer paper to the Garden Green (center) cardstock.
Adhere the Basic White (back) to the Garden Green (back) cardstock.
Holding the Basic White (back) layers in a diamond orientation, adhere the designer paper center layers horizontally using Dimensionals as shown.
Adhere the image layer in a diamond orientation to the designer paper layer using Dimensionals.
Adhere these assembled layers to the top of the Real Red cardstock using Dimensionals.
Stamp the greeting using Real Red ink on the Basic White (greeting) cardstock.
Adhere the greeting along the near the bottom of the Real Red cardstock using Mini Dimensionals.
I have the new Stampin’ Up! Holiday Mini Catalog and the new Scrapbooking brochure for you to peruse now. Just click on the photo of them in the right column of this page.
Don’t forget to use the monthly Hostess Code CZGJ67MM when you place your online order between $40.00 and $150.00, before tax and shipping to get your FREE gift from me! If you’re order is over $150.00, before taxes and shipping, don’t use the Hostess Code because you will receive Hostess Dollars to spend, as well as the FREE gift from me when you place your order! (Just let me know your order was over $150.00 before taxes and shipping.) You add the Hostess Code to your order right before checking out. Please let me know if you have any questions or problems. This month’s FREE gift is your choice of a package of gems from the new 2024 – 2026 Stampin’ Up! Annual Catalog or the Holiday Catalog.
Consider this your official invitation to join us for 3 days of creativity and fun where you’ll learn how to create 20+ unique holiday makes!
During the summit, you’ll get everything you need to start crafting including step-by-step instructions, a list of supplies, and templates.
Holiday Crafts Summit Projects
Here’s a preview of what we’ll be making on Oct 17-19:
The summit is 100% free and you’ll have access to the summit presentations and materials for 24 hours. (Because we want you to take action and get craftin’!)
If you want ongoing access to the presentations as well as the bonuses, you’ll have the chance to purchase the All-Access Pass for just $39 on the checkout page.
Check out this cute card made with the Playful Ghost Stamp Set and the Exposed Brick Embossing Folder. Isn’t it adorable?
Supply List
Playful Ghosts Cling Stamp Set (English) [164366]
Tuxedo Black Memento Ink Pad [132708]
Basic White 8 1/2″ X 11″ Cardstock [159276]
Pumpkin Pie 8-1/2″ X 11″ Cardstock [105117]
Daffodil Delight 8-1/2″ X 11″ Cardstock [119683]
Basic Black 8-1/2″ X 11″ Cardstock [121045]
Pumpkin Pie Stampin’ Blends Combo Pack [154897]
Pool Party Stampin’ Blends Combo Pack [154894]
Pretty In Pink Stampin’ Blends Combo Pack [163824]
Petal Pink Stampin’ Blends Combo Pack [154893]
Stampin’ Blends Color Lifter [144608]
Stampin’ Cut & Emboss Machine [149653]
Exposed Brick 3 D Embossing Folder [161600]
Stylish Shapes Dies [159183]
Glossy Dots Assortment [158827]
Stampin’ Dimensionals [104430]
Multipurpose Liquid Glue [110755]
Stampin’ Seal+ [149699]
Bone Folder [102300]
Paper Snips [103579]
Silicone Craft Sheet [127853]
Paper Trimmer
Measurements
Basic White (base): 4 ¼” x 11”, score at 5 ½”
Basic White (layer): 4” x 5 ¼”
Basic White (image): 2 ½” x 2 ½”
Basic White: scrap
Daffodil Delight: 1 ¾” x 4”
Pumpkin Pie: 1 ¾” x 4”
Basic Black: 3” x 3”
Directions See photos below
Emboss the Basic White (layer), Daffodil Delight and Pumpkin Pie aligning them vertically in the embossing folder.
Adhere the Pumpkin Pie cardstock to the bottom of the Basic White (layer) using liquid glue.
Adhere the Daffodil Delight cardstock above the Pumpkin Pie cardstock using liquid glue.
Adhere the Basic White (layer) to the front of the card base using liquid glue.
Die cut a stitched square using the Basic White (image) cardstock.
Stamp the image using Memento ink in the center of the Basic White square.
Color the image using the Stampin’ Blends Markers.
Use the Light Pool Party Stampin’ Blends Marker around the inside perimeter of the ghost.
Use the Color Lifter to lighten the color.
Use the Light Petal Pink Stampin’ Blends Marker to make cheeks on the ghost.
Use the Light Pretty in Pink Stampin’ Blends Marker to make a slightly darker area on the cheeks on the ghost.
Use the Color Lifter to lighten the cheeks.
Die cut a stitched square using the Basic Black cardstock.
Adhere the Basic White square to the center of the Basic Black square using Dimensionals.
Adhere the squares to the center of the card base using Dimensionals.
Stamp the greeting using Memento ink on Basic White scrap cardstock.
Die cut the greeting using the stitched banner die.
Adhere the greeting diagonally across the upper left corner of the Basic White (image) using liquid glue.
Add several coordinating Glossy Dots to the card front as shown.
I have the new Stampin’ Up! Holiday Mini Catalog and the new Scrapbooking brochure for you to peruse now. Just click on the photo of them in the right column of this page.
Don’t forget to use the monthly Hostess Code CZGJ67MM when you place your online order between $40.00 and $150.00, before tax and shipping to get your FREE gift from me! If you’re order is over $150.00, before taxes and shipping, don’t use the Hostess Code because you will receive Hostess Dollars to spend, as well as the FREE gift from me when you place your order! (Just let me know your order was over $150.00 before taxes and shipping.) You add the Hostess Code to your order right before checking out. Please let me know if you have any questions or problems. This month’s FREE gift is your choice of a package of gems from the new 2024 – 2026 Stampin’ Up! Annual Catalog or the Holiday Catalog.